Pumpkin Bouquet

Hey everyone!

I’ve got another fun DIY project that’s perfect for this time of the year. This cute pumpkin arrangement will look super cute on the front step when trick or treaters come, and it’s also a great centerpiece for Holiday gatherings! 

Here’s what you’ll need to make this: 

  • Pumpkin from the produce department, hollowed out 
  • Enough wet floral foam to fill the pumpkin
  • One package of cash and carry Fall Floral Mum
  • One stem of baby’s breath
  • Mixed Greens
  • Hyacinth stake to hold pumpkin top on the bouquet
  • Scissors or floral knife

Have fun mixing all your favorite fall colors to make this project your own. The possibilities are endless! Have a great Halloween! 

Ashley,
Floral Manager, Sauk Rapids 

DIY – Fall Mums

Fall is just starting to show in the trees, and we have a whole bunch of gorgeous fall decor in stores already! One of my favorite Fall flowers is mums. They add a splash of color and are really fun to dress up to make them even more festive. 

In this arrangement I used a variety of items, all of which you can pick up at the floral department in any of our stores. If your store doesn’t have a full floral department, you can probably find most of these items at a local craft store too! 

What you’ll need is:

  • Mums (indoor or outdoor and any color) 
  • Tin bucket, or other decorative pot, large enough to fit mum inside
  • Floral foam 
  • Wired ribbon
  • Scissor
  • Flexible wire 
  • Cattails 
  • Lotus pod
  • Midelino sticks 

The trickiest part is making the ribbon into the bow. Just take your time with it! Going slow and steady will make it turn out the best. And you can always start over if needed too! 

I hope you enjoy dressing up your fall mums! 

Ashley
Floral Manager, Sauk Rapids

DIY Watermelon Bouquet

Summer is in full bloom and there are so many great flowers available this time of year. If you’ve ever wanted to try your hand at designing your own floral centerpiece, this watermelon bouquet is a great place to start! 

You’ll need:

  • 1/2 Watermelon, scooped out
  • Floral Foam, presoaked in water
  • Floral Tape or Skinny Duct Tape
  • Floral Knife or Shears 
  • Floral Greenery – I used Leather Leaf and Salal (Lemon Leaf) in my arrangement! 
  • 1 Dozen Red Roses
  • 5 Pink Carnations
  • 5 Stems Kermit Button Mums
  • 3-5 Stems Baby’s Breath

You can use any colors of the flowers that you prefer, make it your own and have fun with it! Here’s a few tips to keep in mind as you’re creating your masterpiece. 

  1. Determine where the front of your centerpiece will be. Although you’ll push the stems into the center of the foam, you’ll want to angle the leaves or flowers slightly towards the front of the design to get the best view. 
  2. When you’re putting the stems in the foam, remember it’s not very forgiving! So once you stick it in, leave it there. Be mindful of where you’re putting it beforehand. 
  3. Strip away the extra leaves on the stems of the flowers. Those tend to die off first and grow bacteria making them mushy. By removing them you’ll allow for more air flow and your design will last much longer! 
  4. If you have extra baby’s breath left over, you can put that in a vase with water and they’ll stay good for a long time so you could use them in a future arrangement as well. 
  5. You can also use any left over items by creating a second, smaller version of your bouquet!  Repeat the same process using a green pepper, just use much smaller pieces of greenery and the smallest mum buds so it’s proportional to the pepper. 

I hope these tips will help you succeed with your DIY floral projects! They’re the perfect addition to summertime parties and will get you LOTS of compliments from your friends and family! 

Ashley 
Floral Manager, Sauk Rapids

Easter Crafts With Fiora

All this Spring weather definitely has us looking forward to the snow being gone for the year! However, it’s still to wet outside to fully enjoy the warmth… So bring Spring inside with some of these fun crafts from Fiora!

These are quick and easy projects that are perfect to do with the kiddos. With Easter coming up soon, they are also the perfect addition to your Easter decor. Plus, your kid’s will love showing Grandma all the fun things they made! Continue reading

Valentine’s Crafts

Ashley M. www.cobornsblog.com

Ashley M.

The beginning of the year always goes by SO fast! It’s hard to believe it’s already Valentine’s Day. Luckily that means the end of this cold Winter isn’t too far away either!

Valentine’s Day is always a great time of the year to reflect on the people in your life that mean the most to you, whether that’s a husband, children, siblings, parents or friends. Continue reading

Holiday Centerpiece Ideas

Ashley M. www.cobornsblog.com

Ashley M.

Happy Holidays! This is always a fun time of the year to get crafty and make your own decorations or gifts. I love decorating my home every year for Christmas and I especially love adding more decoration each year. This year, I decided to try out some new ideas for centerpieces. Better yet, they’re all edible!  Continue reading

DIY: B2S Teacher Gift

DIY: Back to School Teacher Gift

http://cobornsblog.com/category/blog/crafty-creations/

Lynell

It’s almost Back-To-School time and whether your child is entering their first year of school or their last, it is always an exciting season full of new beginnings, fun transitions and lots of new things to learn and experience. Continue reading

Confectionery Calligraphy Cake Writing

Confectionery Calligraphy - Cake Writing

www.cobornsblog.com The art of Cakes with Amanda

Amanda

You’ve spent the last hour decorating your perfect cake. The theme is expertly reflected. Maybe it’s robot dinosaurs. Perhaps it’s a sophisticated retirement cake with a hand painted lake scene. Now for the inscription. What are you going to do? Use your normal cursive? Yeah. That’s alright. It’s nice and it’s readable. But what if you continued your theme into the words? What if you made your inscription part of the decorations versus something you snuck in at the end? Continue reading

Salad On A Stick

Lynell

If you know me well you know I am a creative and artistic person… When deciding on a blog topic I thought, “Why not let that creativity shine through with the foods I create?” This food art is titled; “Salad On A Stick” and I just love how great they turned out! My coworkers would agree, as they were completely gone shortly after setting them out to eat at the office.

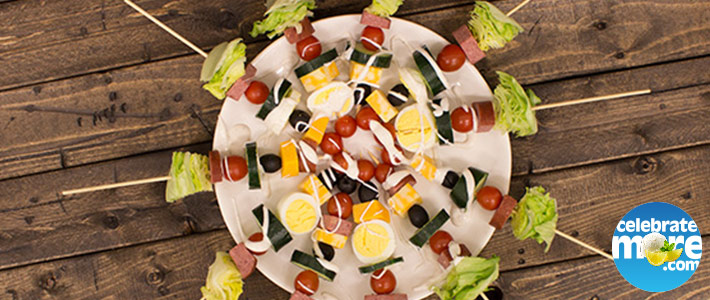
The first secret to a really great Salad On A Stick is to have foods with lots of color and great variety for guests to pick and choose from. The second secret is to have salad dressings that everyone will love! Wishbone has my favorite dressings and their great flavor can really spruce up a salad! I picked all of my favorites to set out when I made these for my coworkers to try. My favorite flavors are Italian, Western, Ranch and of course I had to include the Raspberry Walnut Vinaigrette. If you want to take your salad from okay to outstanding then pick up these delicious dressings from Wishbone to try. Believe me when I say your guests will thank you.

These appetizers are as easy to make as 1, 2, 3.

  1. First pick up your fixins’, dressings and kabob sticks. I purchased blocks of cheese, a variety of meat, hard-boiled eggs, cucumbers, olives, tomatoes and a head of lettuce to break up.
  2. Then cut up your food into cubes or bite size pieces. This will make them easier to eat and less messy for your guests.
  3. Finally prepare them in an eye appealing fashion on the kabob stick. If you’re looking for a more do-it-yourself concept you could make a kabob bar! Simply set the sticks at the beginning of the line, the cubed food in the middle and the Wishbone dressing at the end. Guests will marvel at your creativity and appreciate the opportunity to add their favorite items to their Salad On A Stick.

Salads On A Stick are great for a multitude of events. From barbeques, graduation parties, picnics, potlucks, dinner on the patio, or even as a side for a Bloody Mary bar they are the perfect appetizers and I promise everyone will love them and you’ll love how quick and easy they are to prep for.

The next time snow is in the forecast or the winter weather is getting you down, just remember this blog and be optimistic that soon spring and summer will be here and you’ll have a delicious appetizer to bring to all of your warm weather events!

I hope this crafty creation can bring some inspiration to your life! Be sure to check out the rest of my blog with the link below!

Lynell
Coborn’s, Inc. Graphic Designer