Tags: Frosting

Meet Our Cake Decorators!

Meet Our Cake Decorators!
We have a remarkable staff of incredibly talented and passionate cake decorators… and we would love to introduce you to some of them!
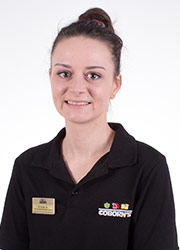
Autumn
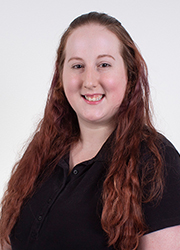 I have only professionally been cake decorating since September of 2018. I would decorate cakes for fun, inspired by my favorite cooking and baking shows. I always watched them growing up and thought, “I want to do that, too!”
Now I am doing my dream job every day! My forté is quirky and whimsical cakes, like me! Anything from a garden full of gnomes to a robot playing football. I’m excited to continue expanding my artistic abilities. One day, I’d love to own my own bakery!
Jonathan
 I’m not a typical decorator who went to school or had lots of training. I’m all self-taught. I started off as a cashier, but I’ve always had a creative side so I jumped at the chance to work in a bakery. Four years later, I’m designing and decorating countless cakes for every guest that walks in! I even did a video for our YouTube channel! I love creating cakes that make your day or event even more special!
Lisa
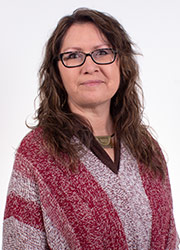 I was born and raised in Central Minnesota. My daughter, Shawma, and I love the MN State Fair. It’s where my partner, Steve proposed to me, right in front of the Midway. I decorated a cake that has all my favorite life memories, including the MN State Fair, becoming a mother and a grandmother and even my Graphic Arts education at SCTCC which helped develop my creative ability that I used in all of the cakes I decorate. Custom designed cakes are a fantastic way to celebrate milestones and memories for yourself or for someone important in your life!
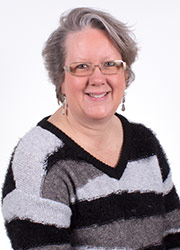
Jill
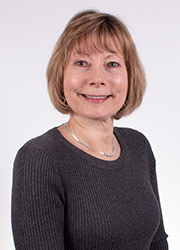 My entire life I have always loved creating art projects and craft items. It has always made me happy and kept me busy. Cake decorating allows me to do both of those for my job so I absolutely love it! My most requested and favorite cake to design is a birch tree stump with a fall theme that has colorful leaves. This cake also comes in a winter theme that has pine bows all over it that is very popular.
The best part of my job is seeing the happiness and excitement when a guest pick up their cake. Sometimes, they even cry tears of joy! It always makes me so happy to see their reaction. I once did a military cake for a women’s organization and when they came to pick up the cake they looked at it and started crying! I thought I did something wrong but they were just beyond thrilled with how it turned out! I love seeing the reaction of our guests when they pick up a cake I’ve created for them!
Martha
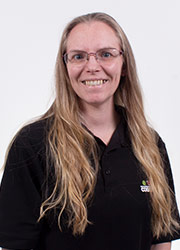 I like to create cakes with bright colors usually with flowers but my most requested cake ordered is the Game Station cake. I didn’t go to school for cake decorating but did take many art classes in high school. My creativity comes from the theme a guest has chosen for their party. I gather ideas and then put my own fun twist to it. I love that I’ve worked here long enough now that I get to see the local kids and families grow, often reminiscing about past cakes I’ve made for them. I’ve created wedding cakes for some and then have had the privilege of creating gender reveal cakes and 1st birthday cakes as their family expands. Reveal cakes are fun especially when the parents don’t even know. I’ve had the experience numerous times of opening the sealed envelope from the sonogram being the first person to know the gender. It’s hard to contain my excitement! I love helping make our guests celebrations even more memorable with a custom-designed cake!!
Ana
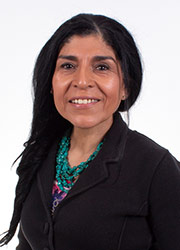 I have been decorating cakes for 12 years at Coborn’s. My love for cake decorating began when I was hired to work in cake production at the Cash Wise bakery in Waite Park. During my breaks, I would watch the cake decorators ice plain cakes and turn them into beautiful cakes that were too pretty to eat. Fortunately for me, a job opportunity opened up at Centennial a few years later, where I would meet Nellie, who would train me into the wonderful world of cake decorating. My favorite cakes to decorate are those with floral designs inspired by nature, and vibrant cakes that are full of colors. Nothing makes my day like seeing customers pick up their cakes and the smiles on their faces when they see them for the first time!
Kelly Jo
 I have been decorating cakes for over 20 years. One of my first cakes I created was a Holly Hobbie design which I entered into the county fair at age 13. From there I moved on to creating roses that looked like cabbages and writing that you couldn’t even read! As I became more skilled, my love for cake decorating became my profession. I was the first cake decorator that was hired at Riverside Coborn’s in Sartell back in 1987. I took some time off to raise my family but returned to the cake decorating world to continue my passion and here I am today!
Melanie
 I grew up watching my mom decorate cakes at home for family and friends. I started working for Coborn’s in 1994 at the central bakery and learned from many great bakers and decorators. I became Bakery/Deli manager at Coborn’s 5th Avenue store and continued decorating cakes. When the Coborn’s Cooper store opened I became a full-time cake decorator. After having a baby, I transferred to Coborn’s in Clearwater as part-time cake decorator. I have taught many cake decorating classes for local grade schools, 4-H programs, U of M extension service and even seniors in nursing homes. I enjoy sharing all that I’ve learned about cake decorating and continue to learn new things from my students. I am passionate about bakery and hope to encourage and inspire new decorators!
Erica
 I’ve been a Coborn’s cake decorator for eight and a half years. I have always been an artsy person, taking a lot of art classes in high school, and particularly love arts that involved working with my hands. When I first started decorating cakes, I found an immediate passion. Since working here, my work has been featured in Minnesota Brides magazine, I’ve won Gold Awards in the Upper Midwest Bakers Convention and have built a loyal guest following. While I am skilled in fondant cakes, I have a passion for creating beautiful cakes out of buttercream icing. One of my specialties is caricature cakes. I just love taking a photo of the guest of honor of a celebration and turning it into a caricature of them on their cake. I am always building my skills and would love helping make your celebration even more memorable!
Amanda
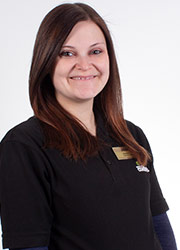 I have been a cake decorator for over 7 years and four of those years have been with Coborn’s. Some of my favorite designs to create are tiered cakes with rosettes on the side. I find rosettes add a very beautiful and elegant touch to cakes. The rosette design is a request I get quite often especially during wedding season because it seems to go great with any theme. The basket weave is another design that I love creating on cakes. It really is a great spring time element and when spring comes around it seems like I go crazy with this design. I can do so much with the basket weave technique and its gorgeous for any event – especially a wedding.
Valentine’s Cupcakes
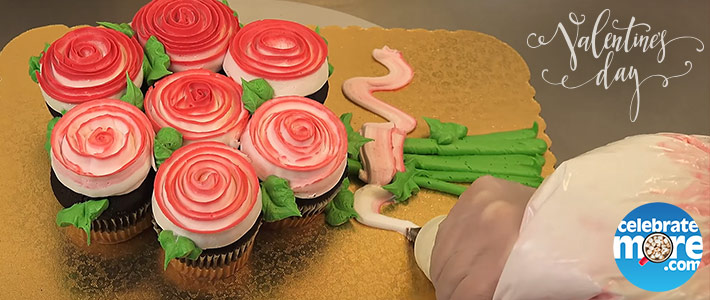
Valentine’s Cupcakes
Can’t decide between getting your sweetheart flowers or a delicious dessert? Here’s an idea that brings them together, an arrangement of cupcake roses! With a turn table you can make these unique looking rose cupcakes, and bonus, it’s a fun technique to try!
Behind The Scenes – Display Cakes

Amanda
Have you ever wondered what the difference is between the cakes you order and the ones you see on display in our stores? We get that question pretty often! Although the display cakes are not made with real cake, they do still have real frosting, and they’re made with just as much time and attention to detail.
Tulips and other Frosting Flowers

Amanda
Summer, a great time to grow your frosting flower garden. And with so many colors and varieties you’ll never have to make the same cake design twice. I thought we could focus in on a specific flower family, the daisies, and explore with inspirations from nature. Let’s try 5 different ways of piping daisies, from a cute and quick style to a detailed eye catcher. I’ll be piping my flowers on large cookies but naturally you can pipe these on any dessert that needs decorating. Continue reading
Rainbow Cake

Amanda
You don’t need a unicorn by your side to create the latest slice of cake magic, the rainbow iced cake! From little kids to grownups who are young at heart this vibrant cake will light up any room at a party. It looks tricky, but with a steady hand and a few piping bags this Continue reading
Spooky Spider Cupcakes

Amanda
Put some creep in your cupcakes this Halloween with these spider treats! To create this critters you’ll need cupcakes, frostings, chocolate sandwich cookies with chocolate filling, malted milk ball candies, and black licorice. Continue reading
How to Ice a Cake with Roll Fondant

Amanda
Time to get fancy! Let’s talk fondant. Get out your rolling pin and nonstick mat and prepare those arm muscles for a little work out. I’ve included a little video to see the process but let’s also discuss the process from supplies to cake.
First thing you’ll need, a few special supplies. A cake, lightly iced. When you put the fondant on top it can get a bit too squishy and create a mess if your frosting is too thick. I’m going to be covering an 8” round, double layered, cake. I used 1 lb. of fondant to cover my cake but you could use a little more to give yourself a little wiggle room when covering. You should also have a fondant smoothing tool, a paddle like looking device, and a nonstick silpat mat for rolling on. Most important you need a rolling pin. I like a big heavy rolling pin for the job. You’ll also need to sprinkle powdered sugar, I like to use a shaker for this, but you could do it by hand too. I also like to use a pizza cutter for trimming my cake. It will roll smoothly around the cake. I don’t use a knife, those I keep far away from the silpat mat. Any knicks or cuts you leave behind when using a blade will show up forever after when you roll out fondant.
Ok, now to get rolling. If you want to color your fondant go ahead and do that first, then cover it up to keep it from getting crusty. Next I base ice my cake and then keep it close as I go back to start on the fondant again.
Knead your fondant, a lot. Keep kneading until it feels silky and smooth. Your hands should warm it up and make it pliable. The more you knead it the better your fondant covering experience will go. If your fondant feels dry and stiff, keep kneading. There should be a little stretch. Once it’s warmed up you can start rolling it out.
 Dust your mat with powdered sugar and place your flattened ball of fondant in the center of the mat. I usually squish it out a little into the shape I want, a circle or a square. Dust the top a little with powdered sugar then start rolling. Keep rolling and rolling. Work the fondant into the shape you want. Rotate your pin, rotate the fondant. If it gets too oval or rectangular don’t be afraid to stretch back into the shape you want with your hands. Covering your cake will be easier if you can keep your fondant in a shape relatively similar to your cake. Keep checking the thickness. Give a little more muscle to the parts that are thicker. It can be tempting to use a thick a slab of fondant on your cake in the excitement of covering your cake, but be patient. A thick slab isn’t going to taste good and can squish your cake down creating slouching and puckering after an hour or so. Go thin. Shoot for about ¼” or less for a typical cake, but a little on the thicker side of that for a shaped cake to allow for stretching.
Now that you are at your desired thickness and size you are ready to cover. How big should it be? The height of your cake x 2, plus the width of the top. Then add a couple inches to allow for fidgeting and fussing.
You want to do the next steps in one, uninterrupted step. Don’t answer the phone, don’t stop for a snack. The fondant is already drying and getting a skin and if you walk away it will wrinkle and tear when you try to do anything with it, then you get to start all over.
Move your iced cake over next to your fondant slab. There are many way and tricks to picking up fondant. I don’t use them. I just pick it up like a pizzeria guy. Do it quick, yet gentle, and keep the fondant moving and you shouldn’t get any tears. If you stand around thinking with it draped over your fingers, yes, it will get deformed, but why are you just standing there? Place your fondant over the cake. There should be a little moisture left in the frosting to make it stick. If you think you are going to take more than 15 minutes to roll out your fondant covering your cake wouldn’t be a bad idea.
Lay your fondant across the top, let the sides drape down. Use your hand to smooth out the fondant from the middle to the outside. Then use your smoothing tool to briskly rub the surface. Apply pressure, just enough to work out any air bubbles. Try to work from the middle to the outside to move out any bubbles. Work quickly; your sides are starting to firm up.
Now for the tricky part, the sides. You need to start smoothing the fondant to the frosting. Work in small areas, going in a circle around your cake. You  don’t need to stick it all at once. Imagine there are horizontal lines on your cake, about an 1 or so apart, just work from the top imaginary ring down to the next. By the time you get to the bottom half you’ll need to gently tug and stretch at the fondant to avoid the folds and pleats. Keep moving, keep working at it, and keep being patient. Smooth as you go to avoid air bubbles.
Once you have your cake covered you can trim the excess off from around the bottom with your pizza cutter. Now pick up your smoother again and start rubbing all over. At this point you are trying to polish the fondant up. Rub out any ripples, move any air bubbles down and out. If you have any stubborn bubbles you can poke a small hole with a thin pin and let the air out. This will leave a hole, but sometimes it’s worth the trade off on stubborn bubbles.
Congratulations! You did it! You have a smooth fondant cake. Have fun dressing it up from this point. You can paint it, stick fondant to it, and quilt it. And don’t forget the important part, you can eat it.
Amanda
Coborn’s Cake Decorator
Sartell, MN – Pine Cone Road
Click Here for more articles written by Amanda

