It’s mid-March, with no snow, abundant sunshine and warm days- It’s giving me spring fever and before we know it Easter will be right around the corner! I love Easter because my entire family, grandkids and all my loved ones are together.
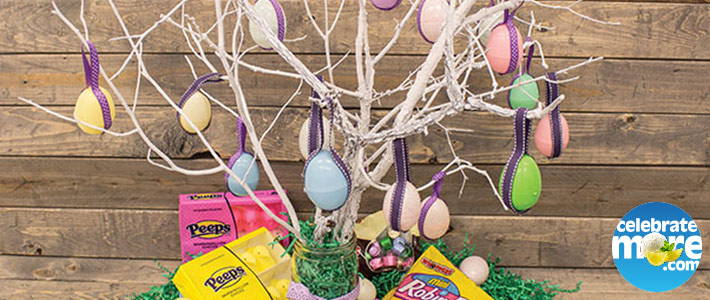
If you know me, you know I love decorating for every season. Easter is no exception and I truly enjoy decking out my home- inside and out- with festive spring decor. This Festive Easter Egg Tree served dual purpose for me this holiday season. I loved that it was an adorable centerpiece. I received tons of compliments on it from my coworkers when I brought it into work to take photos, and I can’t wait to see how much my grandkids enjoy it! It also was a great treat container. Each of these Easter Eggs contain goodies for my guests in it and I can’t wait to watch the kids faces light up when they get to pick some eggs of their very own. Similarly to a Christmas Tree, this Easter Tree made a great place to store the extra “gifts” of candies, Peeps and jelly beans that I had leftover. Add a touch of faux-grass and you just can’t beat this adorable crafty creation.
Check out the list below to see what I used to make this craft!
- A variety of smooth and rough tree branches
- White paint to cover the branches along with a paintbrush
- Plastic Easter eggs
- Fake Easter basket grass- I picked green, but you can pick any color!
- 1 large mason jar
- Bulk candies/sweet treats from the Easter aisle
- Ribbons from local craft store to decorate the outside of the jar as well as hang the egg ornaments from the tree branches
- Optional: If you are making a smaller version of this craft and want to stick some styrofoam at the bottom of the mason jar it can help your branches stay situated easier.
As you can see there isn’t too long of a list to make this craft- which makes it great for a last minute decoration. Check out how I made this craft below!
- First, I collected tree branches from outside. This was an easy task because there was hardly any snow in my yard! It was also fun to do with my grandkids.
- Next, I painted the branches. The smooth branches took on the paint much better than the rough branches did, but I really liked the look of the rough ones so I still used both when I made my tree.
- I tied a ribbon around my large mason jar. If you are like me and reuse mason jars tying it should be just fine, but if you want it to be extra secure add a touch of hot glue to hold the ribbon in place.
- Fill your plastic Easter eggs with a few candies each. Don’t add too many or it may make the branches bend from the extra weight.
- Secure the eggs with a few drops of glue on each side of a looped ribbon. Be sure not to glue over the seal that splits the egg in half or you won’t be able to get the candies out!
- Decorate the Easter tree similarly to how you would decorate a Christmas tree! My tree had almost 20 eggs on it, but I could have added more if I wanted on the extra branches.
Now just toss some candies underneath the tree on Easter morning and enjoy the beauty of your crafty creation! I hope you enjoy this simple blog and you use it to add a little spring fever into your next few weeks leading up to Easter!
Lynell
Coborn’s, Inc. Graphic Designer


